How to Delete Restore Points in Windows 10
System Restore Point is a built-in feature that allows you to quickly restore your Windows PC to an earlier date without losing your personal files. It has been part of the Windows operating system for a long time. . If your PC is not working properly, you can restore your PC to a working previous date to fix all issues in a few minutes.
Depending on the disk space allocated to the System Restore Point, several restore points may be created on your PC. The System Restore Point storage may be configured from a few hundred MBs to GBs of disk space on your PC.
If your PC is running out of free disk space, you might want to delete all or specific restore points to free up disk space on Windows 10 PC. Windows 10 also includes an option to delete all restore points. However, if you want to delete an individual restore point, you need to use a free third-party freeware Restore Point Creator.
Note: Deleting restore points is safe, but remember that you won't be able to restore your PC to an earlier date without a System Restore Point. We recommend keeping at least one System Restore Point or immediately creating a new System Restore Point after deleting all the System Restore Points.
In this post, we will guide you on the following:-
- Delete all restore points in Windows 10.
- Delete specific restore points in Windows 10 using a third-party tool.
- Delete specific restore points in Windows 10 via Command Prompt.
How to delete all System Restore Points in Windows 10?
If your PC is running out of free space and you decided to delete all the System Restore Points, perform the following steps in Windows 10:-
Step 1. Click on the Start button and write Sysdm.cpl.
Step 2. From the available search results, click the Sysdm.cpl to open the System Properties window.


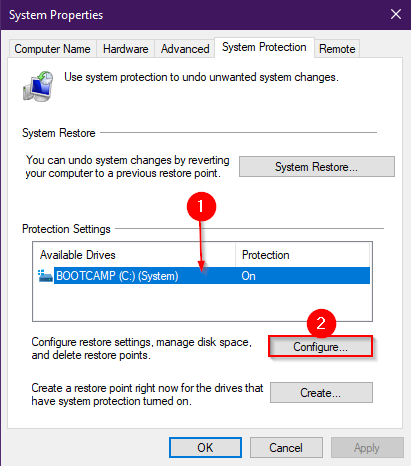
Step 3. Switch to the System Protection tab.

Alternatively, to open theSystem Protection tab, click on the Start button and type "Create a restore point." From the available search results, click on the "Create a restore point" to directly open the "System Protection" tab under the "System Properties" window.

Step 4. In theSystem Protection tab, in the Protection Settings section, select a drive and then click the Configure button.
Note: The System Restore Point feature is separate for all drives on your PC. You need to repeat the steps for every drive.

Step 5. System Protection window opens.

Step 6. In the Disk Space Usage section, click the Delete button.

Step 7. Click the Continue button when you see the warning dialog, "You will not be able to undo unwanted system changes on this drive. Are you sure you want to continue"?

As said above, theSystem Restore Point feature is separate for all drives on your PC. If you want to erase System Restore Point for all drives, you need to repeat steps 4 to 7.
Once you complete the above steps, all the System Restore Points from your Windows 10 PC erases.
We recommend creating a new System Restore Point after deleting all the System Restore Points.
How to delete a specific System Restore Point in Windows 10 using Restore Point Creator?
If you want to delete a specific System Restore Point in Windows 10, you can do the same through a third-party tool or Command Prompt. In other words, to delete a specific System Restore Point, you need to take the help of a third-party freeware tool, Restore Point Creator, or Command Prompt. Restore Point Creator is compatible with only Windows 7 and 8 operating systems, but it works with Windows 10 in our test.
Restore Point Creator is a free utility to manage system restore points, including deleting individual restore points. The program is easy to use and comes with a cool user interface.
To delete a particular System Restore Point in Windows 10, download, install, and run theRestore Point Creator.Select a restore point to delete and then click the Delete Selected Restore Point button to delete the individual restore point.

You can download the freeware utilityRestore Point Creator from here.
How to delete a specific System Restore Point in Windows 10 using Command Prompt?
This is the last option to delete a specific System Restore Point in Windows 10 PC. In this method, we will use some commands to retrieve the list of System Restore Point and then delete the old entry.
Step 1. Open the elevated Command Prompt.
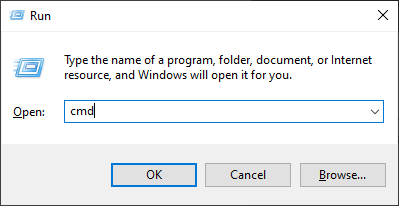
To open the Command Prompt with administrative rights, press Windows Logo + R keys to open the "Run" box. Type cmd and then press Ctrl + Shift + Enter to run the command prompt as an administrator.

Step 2. In the Administrative Command Prompt window, type the following command and press Enter from the keyboard to list all system restore points created for all drives on your computer:-
vssadmin list shadows 
Step 3. Look for the creation date and time, and shadow copy ID for each system restore point. Note down the shadow copy ID.
To delete a specific restore point from your PC, type the following command and press Enter from the keyboard:_
vssadmin delete shadows /Shadow={shadow copy ID} In the above command, replace the shadow copy IDwith your shadow copy ID, which you want to delete.
For my example, we want to delete the first System Restore point, and hence my command will be:-
vssadmin delete shadows /Shadow={76139e98-8123-47c0-a32c-5d47acbb5cb1} 
Step 4. On the next prompt, "Do you really want to delete 1 shadow copy (Y/N)," type Y and press Enter from the keyboard to execute the command.

Once you complete the above steps, you should delete a specific System Restore Point from your Windows 10 PC.
That's all !!!
How to Delete Restore Points in Windows 10
Source: https://gearupwindows.com/how-to-delete-specific-or-all-system-restore-points-in-windows-10/
0 Response to "How to Delete Restore Points in Windows 10"
Post a Comment